Week 12 - Portfolio Piece 1, Draft

Week 12 is here and so if the first draft of my Security Embassy Office scene. I call it a 'draft' because I would like to receive feedback or suggestions from my peers and assessor regarding any final additions/adjustments that can be made. There are some things I am looking to already improve; such as more custom textures, more variety of props (such as a desk fan, books etc) and maybe some minor adjustments to the lighting/cinematography.

For now, here is a visual representation of the scene:
Can you tell what has happened? The building belongs to a government agency I have previously invented and is called the Union State Intelligence Embassy. Union State being a district of Urbania, a city I have created for the same personal project. Of course, this has been infiltrated by some form of spy from a rival agency seeking intelligence, and the agent here has been kidnapped. Where is he now? Who knows. 
The desktop on the PC has been created by myself, however the world map is an image I found here: http://www.chatt.hdsb.ca/~tsangarakisk/


EDIT: After a brief tweak with the brightness, contrast and saturation in Photoshop...


Here is a construction render of the scene with edged faces. As you can see, I exceeded my estimated tri count of 10,000, however I am very pleased with the results of the extra detail.


...and here is a render of just the lighting on it's own.


Week 11 - Workflow Update

This week I continued progress on my embassy office, however slightly behind on schedule as I have been a lot busier this week than usual. Nevertheless, I managed to texture the pc unit, of which is actually a replica of my own. The below screenshots show how the scene looks currently with the textured PC and newly added filing cabinet. As I should have a lot more time in the following week to catch up, I should be back on schedule with a first draft render of the whole scene (textured), with appropriate lighting and materials. Then, after feedback from my peers and self-reflection, I can continue to add final details as I begin work on my second piece after Christmas.


EDIT:

I have played around further with my emissive channel settings and the glossiness of the PC for a more accurate appeal to the brightness and reflectivity of the PC and monitor.


http://blog.jenshellmeier.de/wp-content/uploads/medion_akoya_md8838.jpg
 

Week 10 Drill - Cartoon Drawings


Here are 2 drawings I did in week 10's class drill. Although the second one is actually unfinished, I decided to attempt to complete the hand and arm which was originally behind the child's head. This ended up quite incorrect, however at a first glance it is hardly noticeable. I belive both could be improved with time and practice just like all of my drawings.
 

Week 3 - Tileable Textures


Brick


Organic


Leaf Alpha


Metal
 

NEW Christmas Workflow Schedule

After planning my last schedule, I realised that I completely underestimated the amount of work I had given myself, many due to me overlooking many important details on my portfolio pieces which alone, take up a large proportion of time individually. Hopefully this plan is a winner. Note: I have chosen to focus purely on the Security Embassy piece until christmas, as I believe I will work much faster working one step at a time.

Week 10 - Texture PC Monitors and make them emissive.
               - Add windows and blinds and test lighting.
               - Test corridor lights and more scene materials.
               - Improve look of existing and add new props (e.g. desk).

Week 11 - Texture more props (e.g. PC unit with emissive light(s))
               - Texture walls, door and floor.
               - Model props onto filing cabinet/shelves.
               - Update any more changes to desk or personally unsatisfactory assets.

Week 12 - Texture filing cabinet, shelves and props.
               - Correct and apply appropriate lighting with newly added textures and colour/layout of scene.
               - Tweak material settings where appropriate.
               - Produce a good looking first draft (awaiting feedback and final touches).


Boeing 757-200 - Idea + References

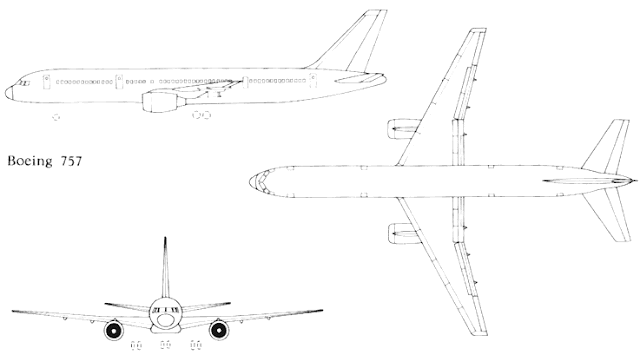
Despite having many previous ideas I have have reconsidered, my 3rd final portfolio piece is going to be a high-poly model of a Boeing 757-200. It is the exterior only, however I may model the cockpit if I get time. Also, I am thinking of making a lower-poly version afterwards, of which I can put into UDK as a static mesh. Here are some references below.


Week 10 - Workflow Update


 Current progress (above)

Here is my current progress on the Embassy Office scene. As you can see, I have been experimenting with lighting and materials much further and have changed the layout of assets. The PC monitors are also now textured with an emissive channel and mental ray material, however the desktop image will hopefully be changed to a custom logo I will be making of the secret agency it belongs to. 

The layout could change again as I'm not 100% sure I am happy with it yet, not to mention the end result of the lighting will be different too. Below is a screenshot of the wireframe and tested materials. The scene is currently 7794 tris (under my 10,000 tri estimate).


Here is an earlier screenshot, showing the older desk and placement with the new windows. I am not yet sure which desk I will be using (even a new one) or where it will be for definate. This will depend many several factors but mainly the lighting.


I have currently stopped work on the Subway Train temporarily, as I wish to complete this scene first.
 

Week 9 Drill - Quick Drawing Exercise


Here is my drawing I made during my week 9 drill. I will admit, it could've been a lot more details if I had managed my time better, however I do believe I drew the scene at the correct perspective. Particularly, I focused on the main assets being the rocks and trees which unfortunately left the rest of the scene incomplete. Regardless, I found the exercise a little challenging and helping with my freehand drawing.
 

Week 9 - Workflow Update


My current progress (Week 9) with my Security Embassy scene. Blogspot somehow reduced the quality of the screenshot and gave it some strange shading problems. Regardless, here it is and as you can see I have had a fairly good start with the modelling. I have tested a few materials and managed to get a nice light seam from the lamp shade. I need to add a window(s) and some lighting coming from the door. Below is the wireframe overlay.


Also, I have began work on the outline shape of the Subway Car interior scene. I only currently have the outline of the shape of the train body. My priority is currently on the embassy scene, so progress on this piece may be temporarily postponed.


OLD Workflow Schedule, Week 8 - 12

Here is an estimated workflow schedule for the next 4 weeks. My aim here is to have these fairly 'small' portfolio pieces polished by the end of the academic year and give myself plenty of time to fix problems and texture, light and materialise the scene appropriately.

Week 8

Embassy – complete modelling (approx under 10,000 tris) – Estimated time: 4 hours
Subway Car Interior – model basic shape of scene (no props)  –  Estimated time: 2 hours
Boeing 747 – model basic shape of body, tail and wings - Estimated time: 1 hour

Week 9

Embassy – uv scene and texture pcs – Estimated time: 3-4 hours
Subway Car Interior – model seats and some additional detail –  Estimated time: 1-2 hours
Boeing 747 – add final detail to body and wings - Estimated time: 1 hour

Week 10

Embassy – finish texturing scene and experiment with lighting and materials – Estimated time: 4-5 hours
Subway Car Interior – model rubbish and other final details, begin uving: several sheets allowed  –  Estimated time:  2 hours
Boeing 747 – add additional detail to body and wings, begin to model high poly engines - Estimated time: 1-2 hours

Week 11

Embassy – final details and render.
Subway Car Interior – complete uvs –  Estimated time:  2 hours
Boeing 747 – add final detail to body and wings, continue work on engines - Estimated time: 1-2 hours

Week 12

Subway Car Interior – texture windows, roof, floor and body panels (signs?) –  Estimated time:  3 - 4 hours
Boeing 747 – begin to model cockpit and additional detail on engines. - Estimated time: 2 hours


Week 7 - Architectural Sketches

Here are 3 sketches that took on average 20-30 mins each to draw, so excuse any details missed. This assignment was intended for practice and getting the underlying visual message accross on paper. You can click to enlarge them.


Quick Illustration Task

A very mini task given to prove that practice is always important when it comes to art. Here is a quick illustration I drew.


Week 6 Drill - Another Matte Image

During class, we had one hour to produce another matte image with our own image sources. Although we were allowed to create any matte image, I still chose to make another landscape. Inspired by a dream I had where a dying dwarf star sets in the horizon I decided to make this. I call it 'End of the Line'.


Source images:


Sunset: http://1ms.net/strong-sunset-over-the-sea-317706.html

Sea and Sky: http://www.hothdwallpaper.net/wallpapers/hd/409228/blue-sea-sky-clouds-wallpapers-hd

Lighthouse: http://www.lighthouseinn-ct.com/lighthouses-by-state/washington-lighthouses/north-head-lighthouse.html

Dwarf Star: http://www.solarsystemquick.com/universe/proxima-centauri.htm

Planet: http://www.starseeds.net/photo/607694main-kepler22bartwork-full
 

Lancer Evolution XI - Idea and References

My final portfolio piece idea has been swapped and changed a few times, hence the delay. I'd like to treat this as 'the big one'. Originally, I wanted to do an ice wolf/fox fantasy creature. However, I went against that idea when I realised A. the difficulty of the fur creation and B. I am not a huge fan of character design and do not believe this is ideal for me. Secondly, I decided to make a wooden house/shack; abandoned and in the center of a forest. One half was going to be in the dark and this side of the forest was going to be dark and unnerving. Whilst the other half was going to be in the 'cheerier' part of the forest, brightly lit and colorful with blossoming flowers. I also believe this would be very challenging to make and may not be completed in time.

Alternatively, I wish to model, and texture a car using appropriate materials, providing It will not be too time consuming. The Mitsubishi Lancer Evolution XI is one of my favorite all time cars and I am hoping to produce a modified version, with a few custom assets (rims, spoiler, body kit etc) and may add more images if I have a new asset that I like.


Week 5 Assignment - Photoshop Fantasy City

This assignment as told, proved to be very time consuming, however proved to be very useful and taught me every useful technique I could use to make concepts by making matte images in the future. Photoshop is definitely a great tool and I believe this is an extremely creative way to provide an accurate way to build a fantasy environment.

Here is my attempt at completing the tutorial I followed here: http://psd.tutsplus.com/tutorials/photo-effects-tutorials/fantasy-city/


Afterwards, I searched the net for a few source images to have a go at making a fantasy city of my own. Here was the result:


In the end, I decided to go for a mood contrast lighting theme. As you can see, I tryed to allow a warm beam of light focus down across part of the city and the frozen sea. The rest has been made a lot colder with a blue overlay which is actual the sky, copied and blended with the upper part of the scene. I also attempted to add a few famous architectural building and made them look slightly more modern with the duplicates and bridges.
 

Week 5 Assignment - Lighting a Simple Scene.


Lighting Comparison.


Final Render.

So here is my recreation of Adam Guzowski's fabulous piece of work "Beauty lies in simplicity". 
Source: http://raph.com/3dartists/artgallery/imagePage?iid=6092

The aim was to light the scene as close as I can to the original and I have used 2 spotlights through a window mesh to do so. One of the lights uses the advanced mental ray shadow map, which has produced most of the lighting detail as far as mood, intensity and colour is concerned. The other uses Ray Traced shadows and is in the same position. allowing the sharper casts of shadow detail of the plant on the wall. It was extremely difficult getting this to 'behave' as it also sharpened the shadows around the window casting a little too much. I also attempted to match the soft lighting seen in the jugs, which was even harder as my lighting was already positioned (almost) correctly on the wall.

As for the modelling and texturing, I used mental ray materials and only textured the wall and cloth. I wanted to keep only the essential detail as this piece is focused on the lighting.


Week 4 Assignment - UDK Brush Scene


This week I have been practicing building with brushes inside the UDK editor. In all honesty, this scene was only my first ever attempt at using brushes, so I decided to use most of my time building which unfortunately left me no time to use my own textures. Instead, I experimented with the textures inside UDK and using the texture alignment tool to re-scale and re-position it appropriately. I have a few visible mistakes, such as the hole at the bottom of the tower and one or two missing windows. Also, I am yet to discover how to add more sides to a cylindrical brush in order to make smoother archways. With more practice and tutorials, these will be overcome over time. Luckily, I remembered to move the dominant light around so the sun casts the lighting in the correct direction as shown in the reference.
 

Subway Train Interior Scene - Analysis and Research

This next piece is inspired by something I see everyday. Public transportation often presents its efficient use after a full day of being used by a lot of people, some places more than others. Busy cities often have plenty of road traffic, so people often prefer to travel by train. My scene will be based inside an urban style (New York?) subway car, with many details to show evidence of its frequent use.

Below is break down of some details I may wish to add, such as dints in the door, vents, signage and lighting which follows the edges of the ceiling.


Below demonstrates my choice of advertisement layout. I like the idea that the signage and lighting is together and displayed as wide, billboard-like flyers.


Typically, users often leave behind trash for the cleaners to take care afterwards. Items such as; tickets, newspapers, coffee/fast food cups and food packets are common culprits. Just last week someone on my train forgot a full packet of HobNobs! Infact, earlier this year (August, 2013) a dead baby shark was found on a subway train in New York! You can read the story here: http://newsfeed.time.com/2013/08/09/solved-the-great-mystery-of-the-nyc-subway-shark/. It just shows that anything can be found on the subway.


Edit: Japan generally has a very clean subway system from what I've seen in comparison to those further west. The image below shows some interesting electronic signage and a lighting reference I may consider alternatively, in conjunction with the details from the 'dirtier', western-style train I have chosen to create.


Security Embassy Scene - Concept and Reference

A great artist cannot simply imagine a concept, without visualising the story behind it, the mood and the kind of message it gives off first. With this in mind I have began to collaborate reference images for my current ideas for portfolio pieces. First of all I have a scene. Inspired by stealth games such as Splinter Cell, Second Sight, Metal Gear Solid and several others I have enjoyed over the years. I particularly like the element of dynamic, low key lighting which is often found in games set mostly at night, in abandoned buildings and top-secret agencies occupied by only a small handful of agents and investigators, or essentially places of importance which are protected by some level of security.

The message I wish to convey from this scene the aftermath of a silent assassination (or sedation in this case). An office, which was once occupied by a lone secret agent, working through his night shift. The room will be be filled with several key props and the rest of the 'fill-in' props for added detail. The key props include a computer and a desk, with a stack or two of paper work and a spilled coffee mug. This is expected to make use of raytrace lighting coming through the window and blinds next to it and the spilled coffee should make good use of reflectivity. Behind will be a bookshelf, with one or two books handing over the edge or fallen over to suggest it has been climbed. This leads onto the open air vent on top, where the cover has been taken off and leaned on the side. Next to the bookshelf is the door, open with a small corridor in view leading to darkness.

With this, I hope to leave the audience with many questions and clues to what may have happened, and achieve the best quality possible.